Sunday, December 22, 2013

It's GIVEAWAY time!

It's time for a giveaway! Thank you so much to all my readers and followers. 

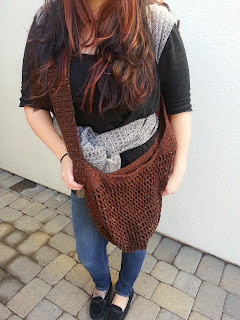
There are TWO prizes this time! This fabulous cross-body babywearing bag was handmade by Mimiz Marketplace. It's the perfect length to cross your and your baby in a carrier. The strap is cushy and won't dig into your neck. It's just the right size for a couple fluffy diapers and the rest of your necessities. Bags (and more!) are available for purchase through Etsy!


The second prize is a 2 oz bottle of hand made Stink Away Diaper Pail Spray! A special blend of essential oils that ELIMINATES odors, it doesn't just cover them up. All natural, non toxic, good for the planet, and good for your nose! Stink Away Diaper Pail Spray is available for purchase through Life As Dallas Knows It.


a Rafflecopter giveaway

Thursday, December 19, 2013

Wrap Review! Lenny Lamb Sunrise Rainbow

I'm starting a new series! I'll be reviewing all the wraps I've tried so far, and I'll review any new wraps that come in. Starting with Lenny Lamb Sunrise Rainbow, the first real wrap I owned! 

Manufacturer: Lenny Lamb
Name: Sunrise Rainbow
Weave: Twill
Blend: 50% Cotton 50% Bamboo

This wrap is the absolute softest wrap I have ever tried. It's soft and floppy straight out of the bag. One wash and it was perfect. The colors are vibrant, but not blinding. I found it to be a bit slippery. My passes would glide easily, but my knots also slipped a lot. When E hit 20lbs (around 4 months!), this wrap lost all its support. Every carry I did would slip and pull. I was sad to see it go!

Wednesday, December 11, 2013

Happy Birthday, Emmalee!

I can't even believe its been a whole year already! My sweet angel baby isn't such a little baby anymore.

Emmalee is not my rainbow baby in the typical sense, but she came to me during a particularly stormy time in my life. She has brightened every day since she arrived. I am so grateful I was chosen to be her mommy.


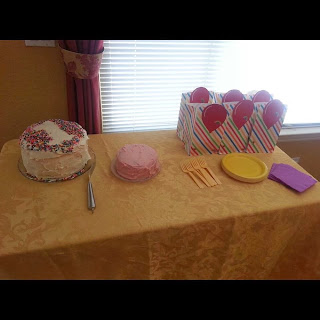
We had a snowstorm early early the day of E's party, so the guest list was cut down quite a bit, but we still had so much fun! I wanted the food to stick with the rainbow theme, so we had rainbow goldfish, gummy bears, a rainbow veggie tray (cherry tomatoes, carrots, yellow bell peppers, cucumbers, blue corn chips, and ranch dressing clouds), multi colored tortilla chips with salsa, and rainbow fruit kebobs (strawberries, cantaloupe, pineapple, kiwi/honey dew melon, grape).


We had a little drama while I was frosting the cake (choking/fainting drama--yikes!) so it didn't turn out perfect, but I'm happy with the results! What would a rainbow birthday be without a rainbow cake?


Happy birthday to my sweet baby girl!

Tuesday, December 10, 2013

Breastmilk Smash Cake!

Emmalee is one! I can't believe this year has gone by so quickly. Bittersweet.

I celebrated Em's half birthday, and I made her a breastmilk cupcake (biscuit, really). I wanted to keep her on the healthy route for her first birthday, so I decided to make her a breastmilk smash cake! You can read my original post here.

I went with whole wheat flour this time, instead of gluten free. Every gluten free baked recipe I've tried has turned out disastrous, so I didn't want to take my chances ruining this one! You'll need:


2/3 cup of breastmilk, which is roughly 4.5 ounces. If you don't have enough you can supplement with coconut milk. I had 3.5 ounces of frozen milk to use, the rest was coconut.
1/2 tsp apple cider vinegar
1/3 cup coconut palm sugar
1/3 applesauce
11/2 tsp vanilla extract
1 1/3 cup whole wheat flour
3/4 tsp baking powder
1/2 tsp baking soda
1/4 tsp salt
3/4 cup chopped fresh strawberries (or your fruit of choice!)

Frosting:
1 cup butter, room temperature
1 1/2 tsp vanilla
3 cups confectioner's sugar
2-3 tbsp Breastmilk (or coconut milk)
(optional) 1.5 tbsp beet juice (pink coloring)

Combine milk & ACV. Let sit for 2-3 minutes or until it starts to curdle. Mine has never curdled, any time I've used this recipe. I just waited until I saw movement (bubbles) and its turned out fine. Beat sugar, applesauce, and vanilla together until smooth. Mix in dry ingredients and beat until smooth. Stir in strawberries. Pour into two 6 inch round cake pans. Bake at 325 for 25 minutes, or until a toothpick inserted into the center comes out clean.

Frosting:
Beat room temperature butter until fluffy. Stir in sugar and vanilla. Add beet juice. Stir in one tablespoon of milk at a time and beat until smooth.

Don't be surprised when you batter looks a little... strange! The coconut palm sugar combined with the whole wheat flour make for an interesting color!


Emmalee really enjoyed her cake! She didn't really dig in, she preferred to be dainty and not get messy!


What do you think of this breastmilk cake? Will you try it?


Wednesday, November 20, 2013

Woolzies Review and GIVEAWAY!

One of the things I always hear about on cloth diaper or babywearing forums is wool dryer balls. Toss a few dryers balls in to help break in a wrap, or to cut your diaper drying time in half. I decided I needed to try some! Wool dryer balls are just what they sound like, wool balls you throw in the dryer.

I tested Woolzies, made from 100% Pure New Zealand Wool.


The box and insert say that Woolzies will:

Soften Naturally
Reduce Drying Time By 25%
Help Eliminate Wrinkles
Help Reduce Static
Save Energy
and are Noise Free


I was really interested in the reduced drying time, so my first test was with my cloth diapers. During the summer, I prefer to dry my diapers in the sun. However, the sun isn't out long enough or hot enough to sun my diapers right now, so I've been using the dryer. To extend the life of my dipes, I make sure to dry them on the lowest heat setting. A full load of diapers (four days worth) will generally take 2-2.5 hours on low to dry completely. I added 6 XL wool balls to the dryer, and my full load of diapers took 1 hour and 10 minutes to dry completely, cutting my drying time down significantly (saving energy and money!). While the balls are not noise free, I can definitely hear them in the dryer, they aren't annoying or extremely loud.

My next test was softening naturally. I did a load of linens without adding the fabric softener I normally use (vinegar), and dried them with nothing but the wool balls. The sheets came out static free and as soft as they normally do. Woolzies suggests adding a few drops of essential oils to a ball for a yummy scent. I added a few drops of lavender to a ball, but I made sure to mark the oiled ball so I wouldn't toss it with my wraps.

Third, I tossed the balls in with a freshly washed wrap, an Ellaroo from our local lending library. It had crunched up quite a bit during it's bath, but the balls beat it up nicely. I don't have any new wraps that need breaking in right now, but I'm eager to see how they do with a wrap right out of the package.


I threw the balls in with my regular laundry also. My only complaint in with my clothes is that the balls get stuck inside sleeves. One worked its way into the sleeve of E's pajamas and it came out stretched.

Overall, Woolzies deliver. I am very pleased with how well they work. Drying time was cut dramatically, my clothes were static free, and each time I used the balls I saved a little money.

Disclaimer: I am in no way affiliated with Woolzies. I was not compensated for my review.
I was given a sample product in exchange for my honest opinion. Life As I Know It is not 
responsible for delivery of prize. Prize shipped directly from Woolzies.

Here's your chance to try Woolzies for free! Winner of this giveaway will receive one box of 6 XL, 100% Natural New Zealand Wool dryer balls for FREE! Enter below!


a Rafflecopter giveaway

Tuesday, October 29, 2013

Whitening Your Teeth Naturally

I HAVE to share this with you guys!

Activated charcoal. Heard of it? Maybe? How about for whitening your teeth? No?

I read this article from Crunchy Betty months ago. I was skeptical, but wanted to try it anyway. I finally got around to buying some activated charcoal (aka activated carbon) about two weeks ago. Oh. My. Gosh. The results are incredible!

Crunchy Betty suggests using capsules of activated charcoal like this. You can open a capsule and it's the perfect amount for one treatment. I chose to purchase this one (wayyy cheaper). It's for an aquarium, so it's tablets instead of powder.


Pour out a bit of the AC.


Grind it up into a powder (I do it mortar and pestle style). You should have roughly a teaspoon of powder. Be careful when dealing with the AC in powder form, it can be harmful if inhaled.


Add a dash of water to make a paste and spread it on your teeth with your finger. I pour the rest in my mouth, swish around a little, and then hold it in front of my teeth. Keep it there 3-5 minutes then rinse WELL, and brush normally.

So easy! You don't have to worry about any harmful chemicals, and it won't cause any tooth sensitivity like traditional peroxide-based whitening creams.


Look! This is after only THREE treatments! You guys, this is amazing! (sorry I don't have Hollywood straight teeth)


Remember, you need ACTIVATED charcoal (carbon). Don't go out and grab a brick from your barbecue, it's not the same thing.

Did you try it? What were your results?

Friday, October 18, 2013

HE Cloth Diaper Routine

I recently made the switch to full time cloth diapering, which means I had to perfect my washing routine. No more getting away with tossing stuff in the sanitize cycle and walking away.

I'm no expert, but from what I've read, the most important part of washing cloth diapers is using lots of water. HE (high efficiency) washing machines are made to use as little water as possible. So that makes washing diapers a challenge.

The first few washes my diapers came out smelling...weird. Not bad, like they were dirty, but kind of musty and earthy. Clean diapers should come out of the wash smelling like nothing, so obviously that wasn't working. I read this was probably detergent build up. As these diapers came to me second hand, it was definitely possible! Because I don't have a good ol' water wasting top loader, I used my bathtub to help me strip the detergent out. I filled the (clean!) tub with cold water and loaded up the diapers. After a few swishes, it was obvious there was detergent in the diapers. I swished and swished then drained the tub and filled it again about 6 times. I then ran 8-10 rinse and spin cycles before they finally came out smelling like NOTHING. Hooray!

I hunted around and I saw that some people open their detergent drawer and add water through it. That's a great idea, except you void the factory warranty and run the risk of damaging your washing machine by adding extra weight the washer isn't accommodating for. If I owned my washer and dryer, I'd absolutely take the risk for clean dipes without 10,000 wash cycles every time, but I don't, so I had to come up with something else.

HE washers weigh your laundry before adding water so the least amount of water can be used. Diapers are absorbent, so that tiny amount of water gets soaked up in the diapers and they flop around not getting clean. So, here's what I've come up with. I am using a Kenmore Elite High Efficiency machine.


  • Saturate diapers with water before tossing them in. There is a utility sink in my laundry room. I fill it with cold water and soak the diapers in it. It's a bit messy transferring the diapers from the sink to the washer
  • One Kids wearcycle with detergent, on warm/warm, 2nd rinse, and auto soak options
  • One Express cycle on cold, 2nd rinse, heavy soil level, no detergent
  • One Rinse&Spin cycle, No detergent. After this cycle I pull the dipes out and smell them. If I smell anything they go back in for another rinse.
I sun my diapers when I can, but if I don't have the time (or the daylight), I tumble dry. Be sure to check your diapers' specifications on using the dryer!

My diapers have come out smelling fresh and clean. It takes a bit of extra work, but I am successfully full time cloth diapering with an HE machine and my dipes are pristine!

What's your wash routine? 

Tuesday, October 15, 2013

Cloth wipes... Again!

Since its gotten a bit colder, my cloth wipe solution isn't working for me anymore! My diaper station is right next to the window and the coconut oil solidifies in the bottle, making the solution a pain to get out of the bottle and a huge mess when it finally sprays out! I fiddled around and have landed on this recipe as my new favorite:


1T Avocado oil
2T baby shampoo
1/2tsp vitamin E oil (or one capsule broken open)
5 drops GSE
10 drops TTO
10 1/2 cups distilled water


You can adjust the recipe if you feel this makes too much, I just like to make a lot at once so I don't have to worry about it.

Tea Tree oil and grapefruit seed extract are both antibacterial and fungus fighting. Because this makes such a large batch, I like to have the essential oils in to be sure no bacterias can grow. Alternatively, GSE is wonderful against yeast. If you're fighting thrush or yeast diaper rash, up the GSE by a few drops.

I keep my solution in a spray bottle and wet each individual wipe before I use it. Soaking the wipes in solution and then storing them wet sets up the perfect breeding ground for nasty bacteria, so if you decide to pre moisten your wipes, add a bit extra tea tree oil to combat the bacteria (but be aware of your baby's sensitive skin!).

A few people have asked if I use disposable wipes for outside the home. I don't. Instead, I have a small bottle (a little plastic spray bottle from the travel section) full of solution and a couple wipes in the diaper bag for when we go out. Dirty wipes go in the wet bag and come home with us!
Let me know how this works for you! :)

Sunday, October 13, 2013

Sizing of woven wraps

Woven wraps come in a variety of sizes, the most common being 2-7. Woven wraps are always sized in meters.

2: 2.6m (8.5ft)
3: 3.1m (10.2ft)
4: 3.6m (11.8ft)
5: 4.2m (13.7ft)
6: 4.6m (15.1ft)
7: 5.2m (17.1)


Why so many different sizes?

The length of the wrap will determine what carry you can do. Multi-pass carries require a longer wrap. Single-pass carries require a shorter wrap.


So how do I know what size to get?
Before purchasing your wrap, you need to determine your base size. Your base size is the size you can do every carry with, including carries with many passes, such as a front wrap cross carry (FWCC) or a double hammock (DH). The "average" person has a base size of a 6. If you consider yourself petite, your base is probably a 5. If you consider yourself to be plus size, then your base is probably a 7.


What about a "shorty"?

A shorty a term used for a short wrap. Short wraps are great for quick carries, such as a ruck, when you don't want long tails. The typical shorty is a size 2 or 3. My base is a 6 and I like using a size 3 as my shorty, because it gives me a little bit more versatility with my carries. Depending on your size (plus/petite) your shorty might be a 2 or a 4.

What about all the other sizes?

There are a few of  you might see that you need "one size up from your base", but for the most part when you are moving one size up or down from your base, the main difference is the way you tie off. For example, a DH carry in a size smaller than your base, you can tie at the shoulder instead of in front.

Here is a list of a few carries the averaged sized person can do with each size wrap. Each carry is linked to a YouTube tutorial. Many of these carries can be done in multiple sizes. If you see a carry listed under a size 3, that means it can also be done in a size 4, or 5, and so on.  Keep in mind, this changes whether you are petite or plus sized. There are many more carries than the ones I've listed. For a more comprehensive list, click here.

2

3

4

5
Petite base size carries

6
Average base size carries

7
Plus size base carries


Wednesday, October 2, 2013

Breaking in a woven wrap

Purchasing a woven wrap new is great. You don't have to worry about any undisclosed stains or rips, pets, smoke, or scents. All new wraps require some form of breaking in.
A broken in woven should:
Feel soft
Be floppy and moldable
Glide smoothly over itself without sticking
Knot easily

Breaking in a wrap essentially means breaking down the fibers, so anything that gets some friction going is going to help. So how do you break it in?

(Wrap pictured is Didymos Anthracite Hemp Indio, 5)

Twist it.
Loop the wrap over the edge of a railing. I use the crib (gotta use that thing for something!). Pull the tails so they are even, your middle marker should be on the railing.

Grab the tails and start to twist

Keep twisting until your wrap ends up in a little knot

Un twist and repeat! It's a great forearm workout!


Braid it.
Braiding a wrap is the same thing as a daisy chain. Tie one tail in a circle.

Stick your hand through the circle and grab the wrap

Pull the wrap through and repeat with your new loop.

Make a hammock.
Hammocks are fun! You can use a table like this mama does, but I use the crib. E was not into the hammock today, so here's what it looks like sans baby


Use it. 
Sorry, no action shots yet!

Of course, using your wrap is one of the best ways to break it in. If it's too stiff for a good wrap job, try one of the above tricks to soften it up first!


A few other ideas:
Steam iron (check the tag for heat settings)
Sit on it
Sleep with it (blanket)
Leave it under the couch cushions for a week
Tug o war
Run it through sling rings

Remember, breaking in a wrap is breaking down the fibers. Don't be afraid to rough it up a bit, it's made to last! (avoid sharp objects, of course)


Happy Babywearing!

Tuesday, October 1, 2013

Breastfeeding a newborn: My tips and tricks

My breastfeeding journey has not been an easy one. It was a lot of work for me to breastfeed my daughter, and I am very proud to have come this far. I had no help, so I had to figure things out on my own. I poured over tons of research and finally came out on top. Here's a little advice for breastfeeding your new baby.

The first few weeks are so hard. A newborn's stomach is teeny, and breast milk is digested quickly, so you nurse a lot. Embrace it. You are forming a wonderful bond with you new baby, and these first weeks are crucial to your breastfeeding experience. Avoid using a pacifier (if you can stand it) and absolutely avoid bottles until at least 6 weeks. I introduced a bottle at 3 weeks, and it was the cause of our downfall.

But I'm worried I'm not making enough milk. My baby constantly wants to nurse! That's good! Remember, newborns have teeny tiny stomachs, they need to nurse often. Your baby is also working on building up your milk supply. Breastfeeding is supply and demand. Your baby needs to nurse in order for you to make enough milk! If you are truly concerned, get in touch with a local lactation consultant (NOT your pediatrician), or WIC office. Ask to see someone with a baby scale. You can weigh your baby, feed them, then weigh again to see how many ounces they've taken. Reno locals, I highly recommend contacting someone at The Nurturing Nest. They are a great resource for you! (no, they didn't pay to me to say that, I just like them!)

My partner wants to bond with the baby also, so they need to give a bottle.
There are so many ways to bond with a new baby that don't involve sabotaging your nursing relationship. Have your partner take their shirt off, strip baby down to a diaper, and they can snuggle up on the comfy couch together under a blanket, basking in each other's newness. Assist your partner in a bath with the new babe: have them get in the bath first while you hand baby over. Let your partner have little squish snuggles in your carrier. All those are far more intimate than a bottle, anyway.

I'm tired! I want to sleep for a feeding during the night.
This is completely understandable. Hang in there mama. In a couple weeks, this will get so much easier. If you just stick it out a little while longer, you'll be far better off than a bottle feeding mama! Sitting up in bed to feed your little one takes far less effort than getting up to prepare a bottle in the middle of the night. You can do it! Practice side lying nursing, once your baby is a few weeks old (I felt comfortable at four weeks). You can relax when you are side lying, and you might even be able to fall asleep! Don't worry, breastfeeding moms have an acute awareness of their child. Be sure to follow the guidelines for safe co sleeping.

Have a basket or a bag you can easily bring with you anywhere in your house stocked with a few essentials:
  • A water bottle (partner:this is your responsibility! Keep this full of icy cold water!) Breast milk is comprised almost completely of water! You should be used to drinking tons of water from your pregnancy, anyway, but staying hydrated is very important. 
  • Non perishable snacks (granola bars, almonds, apples, beef jerky) Breastfeeding gives you a hunger you have not known before! Eating a good, solid meal may not happen as often as you'd like, so be sure to keep your strength up with healthy snacks. 
  • Book/phone/tablet/eReader (and the charger!) Something to keep you entertained while you sit on your sore bum for hours on end. 
  • Children's books (if you have other children) Your older child(ren) will likely be feeling a bit miffed at mommy spending so much time with the new baby. Having books handy to read to them, while you're nursing the baby will help everyone settle into the new routine better. 
  • A pen and paper, or app on your phone, to keep track of which side you last nursed from. Keeping track of feedings themselves is not important. It's not important to nurse at a certain time for a certain number of minutes. It is important to switch back and forth between breasts (somewhat) equally, so your supply is built on both sides. It will be hard for your sleep deprived brain to remember which side was last. This paper or app would also be a good place to track wet/dirty diapers (a great way to tell if your baby is getting enough milk!) 
  • Unrefined coconut oil For those sore nips, coconut oil does wonders. It is safe to apply as much as you want, and does not need to be washed off before baby nurses. 
  • Nursing padsI recommend soft, cushy, re usable pads like these. Or, you could make them yourself, its easy! The disposable pads always stuck to my nipples when I leaked! It was like pulling off a band aid. Ouch!

Whew! That was a lot of information, but I hope that has helped you in some way.

Breastfeeding is hard work. You are an awesome mom for working so hard for your baby! Thank you for breastfeeding.

Thursday, September 26, 2013

Hemp, cotton, silk--OH MY!

You've decided to give wrapping a go? Great! Time to choose your fabric!

Woven wraps can be made with many different types of fibers: Cotton, linen, silk, hemp, bamboo, and wool are the ones you will see most often.

Cotton
Cotton is the most common fiber you'll see a woven made from. Wraps almost always have cotton in them. It is cheap and easily accessible. Because of that, cotton wraps usually have a lower price point than other fibers (excluding handwoven wraps). Cotton is easy to care for. Usually soft right out of the package and requires little breaking in. Some find that cotton wraps aren't supportive enough for heavy babies or toddlers. Cotton tends to be on the warm side.

Linen
Linen is another common fiber. Linen is easy to take care of, although it wrinkles much easier and is prone to perma-creasing. Linen is supportive for heavier babies and toddlers. It is great for hot weather, as it is very breathable. The amount of effort required to break in linen varies from wrap to wrap. I've had a linen wrap that was soft after a wash, and I've had linen that needed a good beating before it softened. Although not terribly expensive (for the babywearing world anyway), linen-blend wraps will usually be priced higher than 100% cotton.

Silk
Silk is a less common fiber you'll find in a woven wrap. Silk wraps are hand wash only, and most must be dryed flat and out of sunlight (but always check the tag before washing/drying). Silk is generally better for smaller babies. It is wonderfully soft, but it often as a "silk smell" to it (that can only be described as the way silk smells!). Silk is not hard to break in, but it takes some time and effort for the smell to go away. Silk is better in cooler weather.

Hemp
Hemp is my favorite! Hemp wraps are rock solid for heavy babies and toddlers. Hemp is very easy to care for. Hemp requires effort to break in. The thicker the wrap, the harder it will be to beat into submission. If you're purchasing a thick hemp wrap (you can tell by the weight of the wrap) I'd suggest buying used if you can. Hemp wraps have a higher price point. Hemp is better in cooler weather.

Bamboo
Bamboo wraps are buttery soft. Woven wraps are typically made from bamboo vicose, which does take some special care. Bamboo is prone to shrinkage, so avoid heat. It must also not be submerged for more than 40 minutes, and air dryed (again, check your wrap's label before washing). Bamboo/cotton blends tend to get saggy with heavy babies. When blended with another fiber, such as hemp, you can get the wonderful softness of the bamboo with the solidity of the hemp (bamboo/hemp blends are pricey). Some say that bamboo is hot, I personally thought it was fine in warm weather.

Wool
Wool is surprisingly breathable during the warm weather! It's great for winter too, a year round wrap. Wool is hand wash only, and needs to be flat to dry. Taking care of your wool wrap is important, improper washing could lead to felting of your wrap, and felting is dangerous. When wool becomes felted, the weave is tightened up. A tight weave is prone to tearing, which you definitely don't want while wearing your baby! Wool wraps are great for big or small babies. Some do have a scratchy wool feel to them. No breaking in will change that, just the nature of the fiber.

A wrap can be 100% one fiber, or it can be a blend of fibers. The possibilities are almost endless. One fiber is not better than another. It truly is a personal preference and what suits your baby.

Monday, September 2, 2013

Why is babywearing so expensive?

If you are new to the babywearing world, particularly wraps, you've probably experienced a bit of sticker shock. I definitley did when I first started! I couldn't fathom spending $150 on a simple piece of fabric! I was apalled at the massive stashes some women had. They must be SO rich! Luckies! That's not always the case. Over my babywearing journey I've come to learn why baby carriers cost what they do.

Why do wraps cost so much?
There are many things that factor into the cost of a woven wrap. The main one is the quality of materials. Wraps can be made of many different things: Cotton, linen, hemp, silk, bamboo, wool, and any combination there of. Just like if you were buying a shirt, a 100% cotton wrap is going to cost less than a 50% Cotton/50% Hemp wrap. The farther away you move from cotton (hemp/bamboo, linen/bamboo, silk/wool/cotton), the more expensive it is to make, therefor the more expensive it is to purchase.

Another contributing factor is that most every woven wrap company prides themselves on being part of the Fair Trade Commission. They are paying their weavers honest wages, so the cost of the product must also go up.

One more thing to consider is most wraps are not woven in the US. Whether you are purchasing directly from a company, or you are purchasing from a US vendor, remember that the cost of importing the wraps to the US has also been factored into the price.

What about the wraps that go for thousands of dollars?!
A product is worth what someone will pay for it. These are wraps that have been auctioned off, and typically handwoven and hard to find wraps. Let's use Uppymama as an example. Uppymamas are hand woven by one person with high quality threads. Weaving is an intricate process, so these wraps retail anywhere from $350-$500. Because they are handwoven by one weaver, only a certain number of wraps are made at one time (around 15). That makes these wraps very hard to find. They are never sold by the retailer for thousands of dollars, they are auctioned off at that price.

How can so many people afford 20, $150 wraps? They must be rich!
They might be! But not necessarily. Stashes of 20 wraps weren't built overnight, they were built over months or more likely, years. As a single mom, I can't afford to drop a hundreds of dollars whenever I want to. When I bought my first wrap, I sold some other baby items in order to fund it. Now, I have a stash because that's where I choose to budget my money. I save for my wraps and carriers, sometimes for months at a time. I also stalk for good deals online or on Craigslist. Buy low, sell high, also applies to baby carriers (within reason, of course!). Buying a wrap or certain buckle carriers is more of an investment than it is a frivolous purchase. Wraps retain their value and can be resold at or near retail value.

Why do the prices of buckle carriers vary so much? Aren't they all just basically the same thing?
Kind of, yes. They are all made with the same design, however, they are not all the same. For example, the Ergo and the Tula have two very different price points. The difference is in the construction of the carrier. The Ergo and Tula are both well made carriers, however, the Tula is built to last longer. It has a bigger seat, a bigger body, and it is able to support more weight in the long run than the Ergo. For a visual example, see the picture below.

Can't I just make it myself? Won't that be cheaper?
Sure! There are plenty of mamas who use DIY wraps and ring slings! I recommend checking out the DIY Facebook Group , there will be a ton of resources there for you. 

Friday, July 26, 2013

I'm new to babywearing. Where do I start?

I put together this resource for the Reno Babywearing Group. If you are in the Reno/Sparks/Tahoe area and are interested in babywearing, come join us here!

 I'm new to babywearing, where do I start?

The world of Babywearing can be intimidating at first.  There are so many different choices out there. 

There are a few questions you need to ask yourself before choosing a carrier.
  • What kind of carries do I want to do?  Front carries? Back? Hip?
  • Is this carrier just for me, or am I going to share it with someone else?
  • How much time do I want to put into learning how to use my carrier?
  • Am I going to nurse in it?
  • Am I going to be in extreme weather (hot/cold?)
Common carrier choices you might see are:
Soft structured carrier
Mei tai
Ring sling
Stretchy wrap
Woven wrap
Here’s a great chart that explains the pros and cons of carriers: http://www.frogmama.com/newstylechart.htm

Soft structured carrier (SSC): A soft structured carrier is a rectangular piece of fabric with a waist belt and shoulder straps that buckle. SSCs are easy to learn how to use and are very “daddy friendly”.  You can do a front, back, and with some brands, a hip carry. There are several different brands to choose from.  SSCs are generally pretty cool in warmer weather. Most SSC can be used when your baby weighs 8lbs with a weight limit of 35lbs. There are toddler versions of some carriers that go up to 50lbs. They are not one size fits all so be sure to check a sizing chart before you make a purchase. 


Mei Tai (MT): A mei tai is similar to a SSC, but instead of buckles it has ties. A MT is an Asian style carrier. It’s very easy to learn. You can do a front, back, or hip carry in a MT.  A mei tai is a great choice if you’re going to share the wearing responsibilities with your significant other, because it is adjustable from person to person. Most mei tais fit sizes 0-22 and they are available with plus size straps. Most can be used with a newborn, but safer positioning can be achieved in a different carrier.


Ring Sling (RS): A ring sling is a piece of fabric attached to two rings. The fabric is threaded through the rings to create a seat for the baby. Ring slings are wonderful for newborns and great for nursing discreetly in. They are fairly adjustable from wearer to wearer. You can do a front, hip or a back carry (FOR ADVANCED WEARERS ONLY). You may not like a RS with a heavier baby because it is a one-shoulder carrier. An important note about ring slings: Your ring sling’s rings should not have any seams (welded). Welded rings are unsafe for babywearing, as the weight of the baby can cause the rings to snap and your baby to fall. If you are using a ring sling with welded rings, discontinue use and contact the manufacturer immediately.


Stretchy Wrap (stretchy): A stretchy wrap is a long piece of stretchy fabric, usually jersey knit, that you tie around your body. Stretchies are great for newborns. Front carries are the only safe carries in stretchy wraps.  Most stretchy wraps have a weight limit that goes up to 35lbs, but they tend to become unsupportive and sag around 15lbs. Stretchy wraps are a good choice if more than one person is going to be wearing, because they are very long and will go from person to person easily.


Woven Wrap (Woven): A woven wrap is a long piece of woven fabric, often hand woven. It is a similar concept to a stretchy wrap, but it doesn’t stretch. There is no weight limit for a woven wrap, you could wrap an adult safely (but probably not comfortably). You can do a front, back, or hip carry in a woven wrap. Wovens are very versatile from person to person, depending on the size. The learning curve for a woven is a bit higher than the rest of the carriers mentioned, but it is doable.


Where do I buy my carrier?
Generally, when purchasing a carrier, you’re going to be making an online purchase. When purchasing a SSC (particularly an Ergo) it’s important to make sure you’re buying your carrier from an authorized retailer. There are lots of fake versions of carriers made and sold cheaply that are unsafe for babywearing. Baby carriers go through extensive weight testing in order to be deemed safe and compliant with regulations, and these knock off carriers go through none of that.  There have been many reports of carriers breaking with babies in them! To be safe, stay away from eBay. If the price seems too good to be true, it probably is.

Here’s a few places to buy a SSC


And a list of authorized retailers to get an Ergo from:

Comment on this post if there’s a site you’d like me to add!


Buying a wrap is the same. The Moby you’ll be able to find in most stores that carry baby items, but if you’re looking to purchase a woven wrap, you’ll most likely need to purchase online.  Most wraps are woven and sold from foreign countries. You can purchase directly from the manufacturer if you want to, but there are a number of different vendors based in the US to order from. One of the most common places to purchase a wrap is The Babywearing Swap on Facebook. It can be a bit overwhelming to a newbie, and it takes a while to get used to the way things work. Here’s a link to a blog from Babywearing 102 on Navigating The Babywearing Swap. When purchasing from a WAHM (work at home mom) from a place like Etsy, it’s important to make sure they are compliant with safety regulations. Do your research first! Your baby’s life is in the maker’s hands!

These are the vendors I have experience with and recommend making a woven purchase from:


Please comment or PM me if there’s another vendor you’d like to see added!


Some FAQ’s taken from Babywearing 102 with permission (https://www.facebook.com/groups/Babywearing102/doc/472751159479734/)
How do people afford so many carriers? 
Just like any luxury item, it comes down to budgeting and where it fits in priority wise. Some people make room on their budgets for cable, eating out, wine, vacations, etc. Many large stashes are built over the course of several years. Many people take time and save up for wraps little by little. Not everyone with a large stash is wealthy and not everyone with a small stash is strapped for cash.

Why are carriers and wraps so expensive? 
Woven wraps are made from fine textiles that must be strong enough to endure wear and tear from daily wearing and hold large children. They are often quite long pieces of fabric and intricately woven. It is similar to how sheets made of fine material and with a high thread count to endure lots of washes come with hefty price tags. Starting in 2014, wraps and carriers must pass extensive testing which is quite costly and will be another factor in cost.

Why are used wraps just as expensive (or more) as new wraps? 
Baby carriers in general retain their retail value or stay close to their retail value for a few reasons. One reason is that wraps are usually easier to wrap with and more comfortable once they are broken in, and some wraps can take a lot of work to break in. What do we mean by that? Well, you know your favorite old t shirt or pair of jeans and how soft and comfy it fits? That's the fibers being broken in. Another reason why wraps maintain or increase value is that many wraps are limited editions and can no longer be purchased new, so there is a collectable aspect. Some wraps require "stalking" to purchase because such a small quantity is released. Like any product, higher demand equals higher value.

Can I make my own carrier? 
Of course! Check out the DIY Babywearing and Advice group for comprehensive info here: https://www.facebook.com/groups/334070496681248/?fref=ts

Sleeping Baby Productions also has some great info on DIYs including info on which fabrics are safe to use. Here is her general DIY site: http://www.sleepingbaby.net/jan/Baby/index.html

And here is a link to which fabrics are safe to use: http://www.sleepingbaby.net/jan/Baby/fabric.html

Sunday, July 21, 2013

The thing about attachment parenting is...

My baby is glued to my side 98% of the day. 1% of the day she's content with me out of her sight, and the other 1% she's crying and crawling after me.

It's tough. I'd really enjoy a shower or bathroom break by myself. I'd like to walk back and forth between the bedroom and the laundry room without toting 25lbs of squirmy with me, or without a meltdown. Cleaning would be much easier if I didn't have to do squats the whole time with a baby strapped to my back.

But the thing is, the day is coming when my arms will ache because they're empty, not because they've been overworked. There is a time coming when she would rather play than snuggle. Sooner rather than later, she will be the one turning and walking away from me.

These past (almost) 8 months have literally flown by. My days slip away like feathers in a breeze.

I'm changing my thinking.

I will cuddle, I will carry, I will bed share, I will wear, I will do what I can when I can how I can to be close to this incredible baby.

Because my time with her is too precious not to.

Thursday, July 18, 2013

Cloth Wipes

To save a bit of money, I've made the switch to cloth wipes.

I had a ton of receiving blankets sitting in a drawer not being used, so I cut them up into wipe size. I cut up about ten blankets, and I made 7-8 wipes out of each. I still have roughly 30 blankets sitting in the drawer. I didn't worry about hemming them because I have so many. I figure once they get too ratty I'll just toss them and cut up another blanket.

I poked around the internet for a good cloth wipe solution. There are a ton of recipes out there! Honey, chamomile, all kinds of stuff. E's butt is special, but not that special ;) I chose to go the plain route. Here's what I used:


Organic coconut oil
Distilled water (leftover from when I was supplementing, gotta use it up somehow!)
Baby shampoo (bought this for E before we went poo-less and its just sitting around collecting dust)
Lavender essential oil
Tea tree oil

The recipe I went off called for 2T oil, 2T soap, and 1 1/2 cups water. It wasn't until I had already poured all that out that I realized how off those ratios seemed to me. That's an awful lot of soap for a little baby butt. I ended up with this as my final:

2 T coconut oil
2 T baby shampoo
10 1/2 C distilled water
10 drops TTO
10 drops Lavender oil

I thought I would like using a squirt bottle (my peri bottle from the hospital...reuse and recyle!), but I'm finding that the solution comes out way too fast, the recieving blankets can't soak up the liquid fast enough and I end up making a mess (and wasting my solution). I'm going to switch to a plain ol' spray bottle. I strongly recommend spraying the WIPE not the baby bum :P


Pee wipes (which there aren't many of, I don't wipe pee unless she's been in a disposable for an excessive amount of time, I let her bits air dry) I stick in a laundry bag waiting to be washed. Poo wipes I soak in a solution of washing soda and water until they're ready to be washed to help combat stank and stains. If you aren't planning on washing every 1-2 days, add a couple drops of TTO or some vinegar to help combat mold.

There you have it! If I had to guess, I'd say it cost me around 1.10 to make the solution, and I didn't buy a single receiving blanket when E was born. They may not be the perfect cloth wipes, but they work great and they were CHEAP!